# 七、并发集合
# 1. Vector
线程安全的 ArrayList。
重要方法都加上了 synchronized,性能较低。
public synchronized boolean add(E e) {
    modCount++;
    ensureCapacityHelper(elementCount + 1);
    elementData[elementCount++] = e;
    return true;
}
# 2. Hashtable
线程安全的 HashTable。
重要方法都加上了 synchronized,性能较低。
public synchronized V put(K key, V value) {
    .....
}
public synchronized V remove(Object key) {
  	.....
}
# 3. Collections.synchronizedList
虽然 ArrayList 和 HashMap 是线程不安全的,但是可以用
- Collections.synchronizedList(new ArrayList<E>())
- Collections.synchronizedMap(new HashMap<K,V>())
使之变成线程安全的。
public static <T> List<T> synchronizedList(List<T> list) {
    return (list instanceof RandomAccess ?
            //ArrayList 和 HashMap 都实现了 RandomAccess
            new SynchronizedRandomAccessList<>(list) :
            new SynchronizedList<>(list));
}

SynchronizedRandomAccessList(List<E> list) {
    super(list);
}

public boolean add(E e) {
    synchronized (mutex) {return c.add(e);}
}
public boolean remove(Object o) {
    synchronized (mutex) {return c.remove(o);}
}
不过是将 synchronized 加在方法里面而已,跟前面的 Vector 和 Hashtable 没什么区别。
# 4. ConcurrentHashMap
# 4.1 JDK7
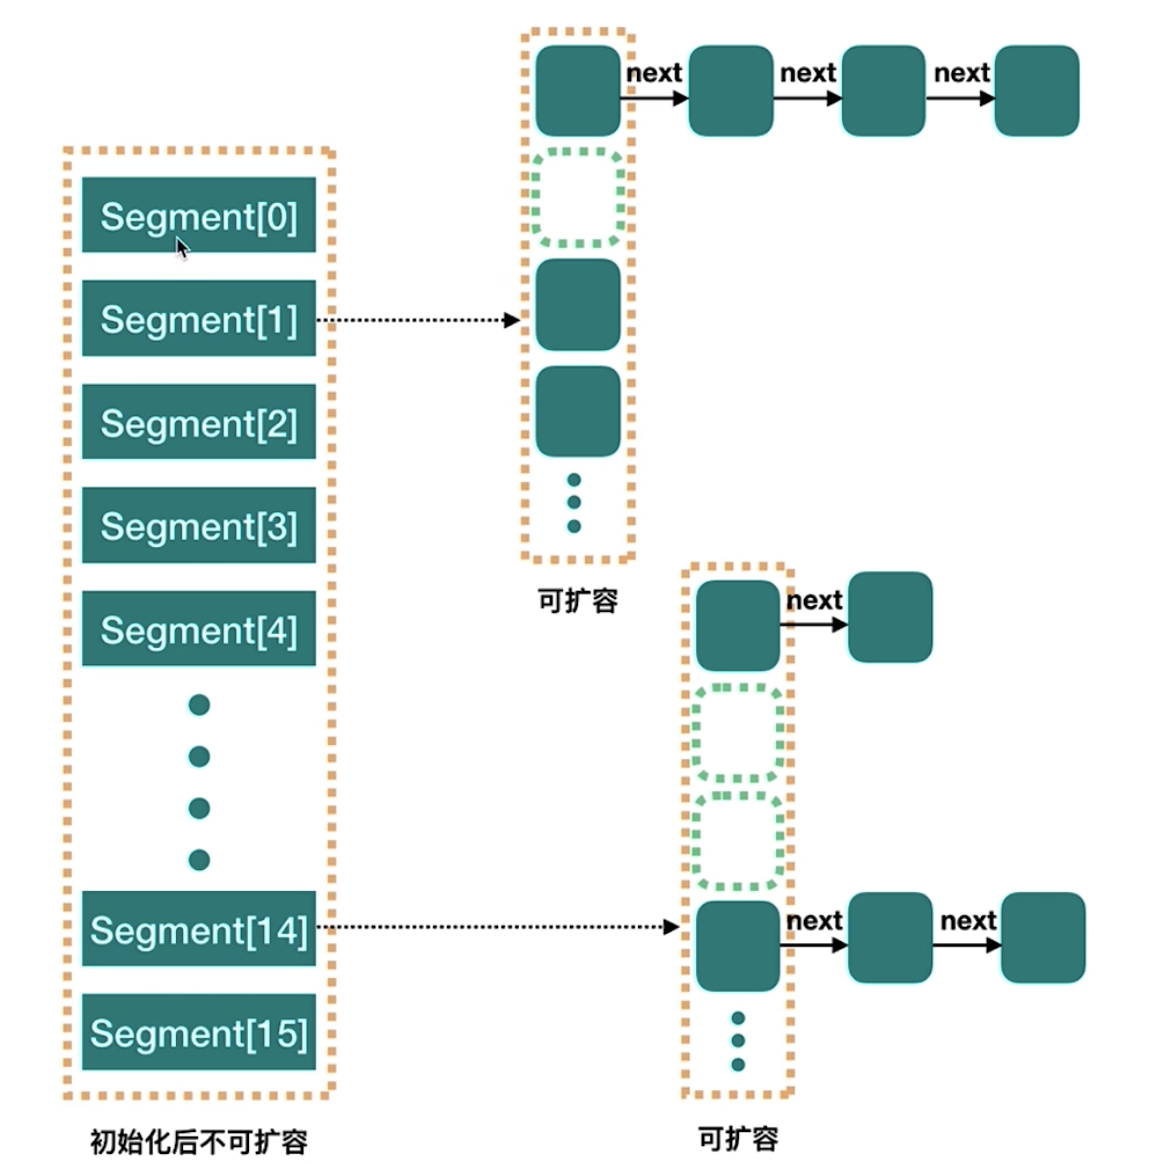
- JDK7 中的 ConcurrentHashMap 最外层是多个
segment,每个 segment 的底层数据结构与 HashMap 类似,然后是数组+链表组成的拉链法。 - 每个 segment
独立上 ReentrantLock 锁,每个 segment 之间互不影响,提高了并发效率。 - ConcurrentHashMap 默认有
16个 segment,所以最多可以同时支持 16 个线程并发写(分别操作在不同的 segment 上)。这个默认值可以在初始化的时候设置为其他值,但是一旦初始化后,是不可以扩容的。
# 4.2 JDK8
# put()
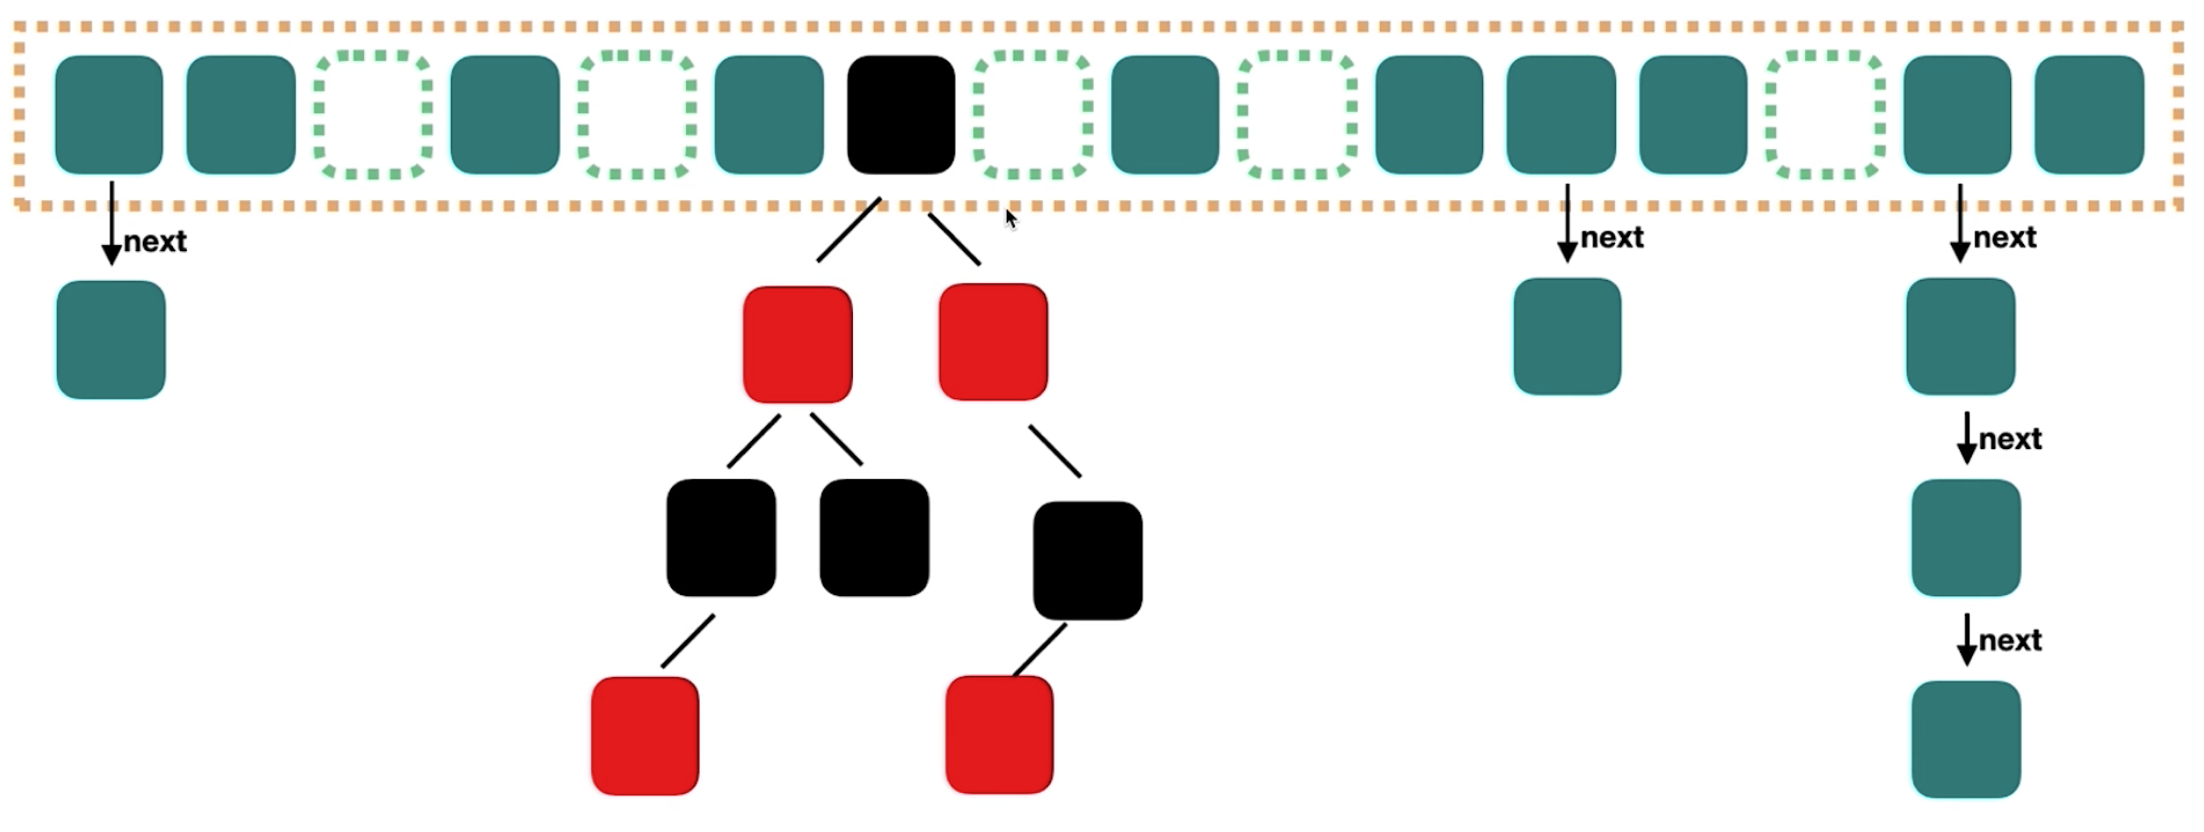
线程安全的核心:CAS(赋值) 加 synchronized(扩容),使得每一个 Node 都是并发独立的,效率比 JDK7 更高。
- 判断 key, value 不为空。
- 计算 hash 值。
- 根据对应位置节点的类型来赋值,可能是 helpTransfer,可能是增长链表,可能是给红黑树加节点。
- 检查满足阈值就“红黑树化”。
- 返回 oldVal。
public V put(K key, V value) {
    return putVal(key, value, false);
}

/** put真正的实现 */
final V putVal(K key, V value, boolean onlyIfAbsent) {
  	//ConcurrentHashMap 中 key 和 value 不允许为 null(HashMap 允许)
    if (key == null || value == null) throw new NullPointerException();
    int hash = spread(key.hashCode());
    int binCount = 0;
    for (Node<K,V>[] tab = table;;) {
        Node<K,V> f; int n, i, fh;
      	//1. 初始化 table
        if (tab == null || (n = tab.length) == 0)
            tab = initTable();
      	//2. 计算 hash,判断元素应该放哪里,如果位置为空
        else if ((f = tabAt(tab, i = (n - 1) & hash)) == null) {
          	//2-1 那么直接用 CAS 插入元素
            if (casTabAt(tab, i, null,
                         new Node<K,V>(hash, key, value, null)))
                break;
        }
      	//3. 判断当前状态是不是 MOVED,MOVED 表示一种扩容状态,是 MOVED 表示数据转移,在 map 扩容的时候就会进行数据转移
        else if ((fh = f.hash) == MOVED)
            tab = helpTransfer(tab, f);
        else {
          	//4. 如果槽点有值
            V oldVal = null;
          	//4-1 锁住
            synchronized (f) {
                if (tabAt(tab, i) == f) {
                  	//看看是链表吗
                    if (fh >= 0) {
                        binCount = 1;
                        for (Node<K,V> e = f;; ++binCount) {
                            K ek;
                          	//4-2 如果这个 key 之前就存在
                            if (e.hash == hash &&
                                ((ek = e.key) == key ||
                                 (ek != null && key.equals(ek)))) {
                              	//4-3 更新值并返回
                                oldVal = e.val;
                                if (!onlyIfAbsent)
                                    e.val = value;
                                break;
                            }
                            Node<K,V> pred = e;
                          	//4-4 如果这个 key 之前不存在,就尾插法插入链表
                            if ((e = e.next) == null) {
                                pred.next = new Node<K,V>(hash, key,
                                                          value, null);
                                break;
                            }
                        }
                    }
                  	//看看是红黑树吗
                    else if (f instanceof TreeBin) {
                        Node<K,V> p;
                        binCount = 2;
                      	//是则进行红黑树的操作
                        if ((p = ((TreeBin<K,V>)f).putTreeVal(hash, key,
                                                       value)) != null) {
                            oldVal = p.val;
                            if (!onlyIfAbsent)
                                p.val = value;
                        }
                    }
                }
            }
            if (binCount != 0) {
                if (binCount >= TREEIFY_THRESHOLD)
                    treeifyBin(tab, i);
                if (oldVal != null)
                    return oldVal;
                break;
            }
        }
    }
    addCount(1L, binCount);
    return null;
}
# get()
- 计算 hash 值
- 找到对应的位置
- 直接取值
- 红黑树取值
- 链表取值
public V get(Object key) {
    Node<K,V>[] tab; Node<K,V> e, p; int n, eh; K ek;
  	//1. 算出 hash 值
    int h = spread(key.hashCode());
  	//2. 得有元素,没有元素则返回 null
    if ((tab = table) != null && (n = tab.length) > 0 &&
        (e = tabAt(tab, (n - 1) & h)) != null) {
      	//3. key 在槽点
        if ((eh = e.hash) == h) {
            if ((ek = e.key) == key || (ek != null && key.equals(ek)))
                return e.val;
        }
        //4. key 在红黑树
        else if (eh < 0)
            return (p = e.find(h, key)) != null ? p.val : null;
      	//5. key 在链表
        while ((e = e.next) != null) {
            if (e.hash == h &&
                ((ek = e.key) == key || (ek != null && key.equals(ek))))
                return e.val;
        }
    }
    return null;
}
# 为什么 JDK8 要改成红黑树?
红黑树的查询效率logn 更高。

# 为什么是链表中元素个数大于 8 才变呢?
红黑树每个 Node 的空间是链表每个 Node 的两倍,数量太少就没必要了。
数量多的时候才转。
hash 冲突 8 次的概率的极低的,如果出现了碰撞 8 次,是一种比较极端的情况,可能是 hash 算法出问题了,为了在这种极端情况下还能正常进行插入、查询等操作,就转为红黑树了。
0: 0.60653066
1: 0.30326533
2: 0.07581633
3: 0.01263606
4: 0.00157952
5: 0.00015795
6: 0.00001316
7: 0.00000094
8: 0.00000006
# 5. CopyOnWriteArrayList
# 5.1 诞生原因
Vector 和 SynchronizedList 的锁的粒度太大,并发效率比较低,并且迭代时无法编辑。
# 5.2 适用场景
读操作尽可能地快,而写即使慢一些也没有太大关系。
- 黑名单的更新。
# 5.3 读写规则
读取是完全不用加锁的,即使是写入也不会阻塞读取操作。
只有写入和写入之间需要进行同步等待。
public class CopyOnWriteArrayListDemo {

    public static void main(String[] args) {
        CopyOnWriteArrayList<String> arrayList = new CopyOnWriteArrayList<>();
        arrayList.add("1");
        arrayList.add("2");
        arrayList.add("3");
        arrayList.add("4");
        arrayList.add("5");
        Iterator<String> iterator = arrayList.iterator();
        while (iterator.hasNext()){
            System.out.println("list = " + arrayList);
            String next = iterator.next();
            System.out.println(next);
            if (next.equals("2")){
                arrayList.remove("5");
            }
            if (next.equals("3")){
                arrayList.add("3 found");
            }
        }
    }
}
结果:
list = [1, 2, 3, 4, 5]
1
list = [1, 2, 3, 4, 5]
2
list = [1, 2, 3, 4]
3
list = [1, 2, 3, 4, 3 found]
4
list = [1, 2, 3, 4, 3 found]
5  //拿的还是旧的5,而不是新的 3 found
# 5.4 实现原理
读写分离:
- 先用老集合 copy 出一份新集合。
- 然后在新集合上做修改。
- 最后用新集合直接替换老集合。
# 5.5 缺点
数据一致性问题
CopyOnWrite 容器只能保证数据的最终一致性,不能保证数据的实时一致性。所以你如果你希望写入的数据马上能读到,那就不能用 CopyOnWrite 容器。
内存占用问题
因为 CopyOnWrite 的写的复制机制,所以在进行写操作的时候,内存里会同时驻扎两个对象的内存,会额外占用一定的内存。
# 5.6 源码分析
属性
public class CopyOnWriteArrayList<E>
    implements List<E>, RandomAccess, Cloneable, java.io.Serializable {
    private static final long serialVersionUID = 8673264195747942595L;

    /** 锁 */
    final transient ReentrantLock lock = new ReentrantLock();

    /** 数组,只有 get 和 set 方法可以访问到这个 array */
    private transient volatile Object[] array;
E get(int index)
/**
 * @throws IndexOutOfBoundsException {@inheritDoc}
 */
public E get(int index) {
    return get(getArray(), index);
}
E set(int index, E element)
/**
 * Replaces the element at the specified position in this list with the
 * specified element.
 *
 * @throws IndexOutOfBoundsException {@inheritDoc}
 */
public E set(int index, E element) {
  	//1. 先获得锁
    final ReentrantLock lock = this.lock;
    lock.lock();
  	//2. 上锁
    try {
      	//3. 获取数组
        Object[] elements = getArray();
      	//4. 获取 index 位置上的元素
        E oldValue = get(elements, index);
				//5.1 如果元素不同,则需要插入新的元素
        if (oldValue != element) {
            int len = elements.length;
          	//6. 复制一份新的数组
            Object[] newElements = Arrays.copyOf(elements, len);
          	//7. 插入新元素
            newElements[index] = element;
          	//8. 用新数组覆盖旧数组
            setArray(newElements);
        } else {
            //5.2 如果元素相同,则直接原地赋值
            setArray(elements);
        }
      	//9. 返回旧值
        return oldValue;
    } finally {
      	//10. 解锁
        lock.unlock();
    }
}
boolean add(E element)
public boolean add(E e) {
  	//1. 获得锁
    final ReentrantLock lock = this.lock;
  	//2. 加锁
    lock.lock();
    try {
        Object[] elements = getArray();
        int len = elements.length;
      	//3. 复制出一个 len+1 的新数组
        Object[] newElements = Arrays.copyOf(elements, len + 1);
      	//4. 插入新值
        newElements[len] = e;
      	//5. 覆盖旧数组
        setArray(newElements);
        return true;
    } finally {
      	//6. 解锁
        lock.unlock();
    }
}
# 6. BlockingQueue

# 6.1 阻塞队列 BlockingQueue
# 6.1.1 阻塞队列
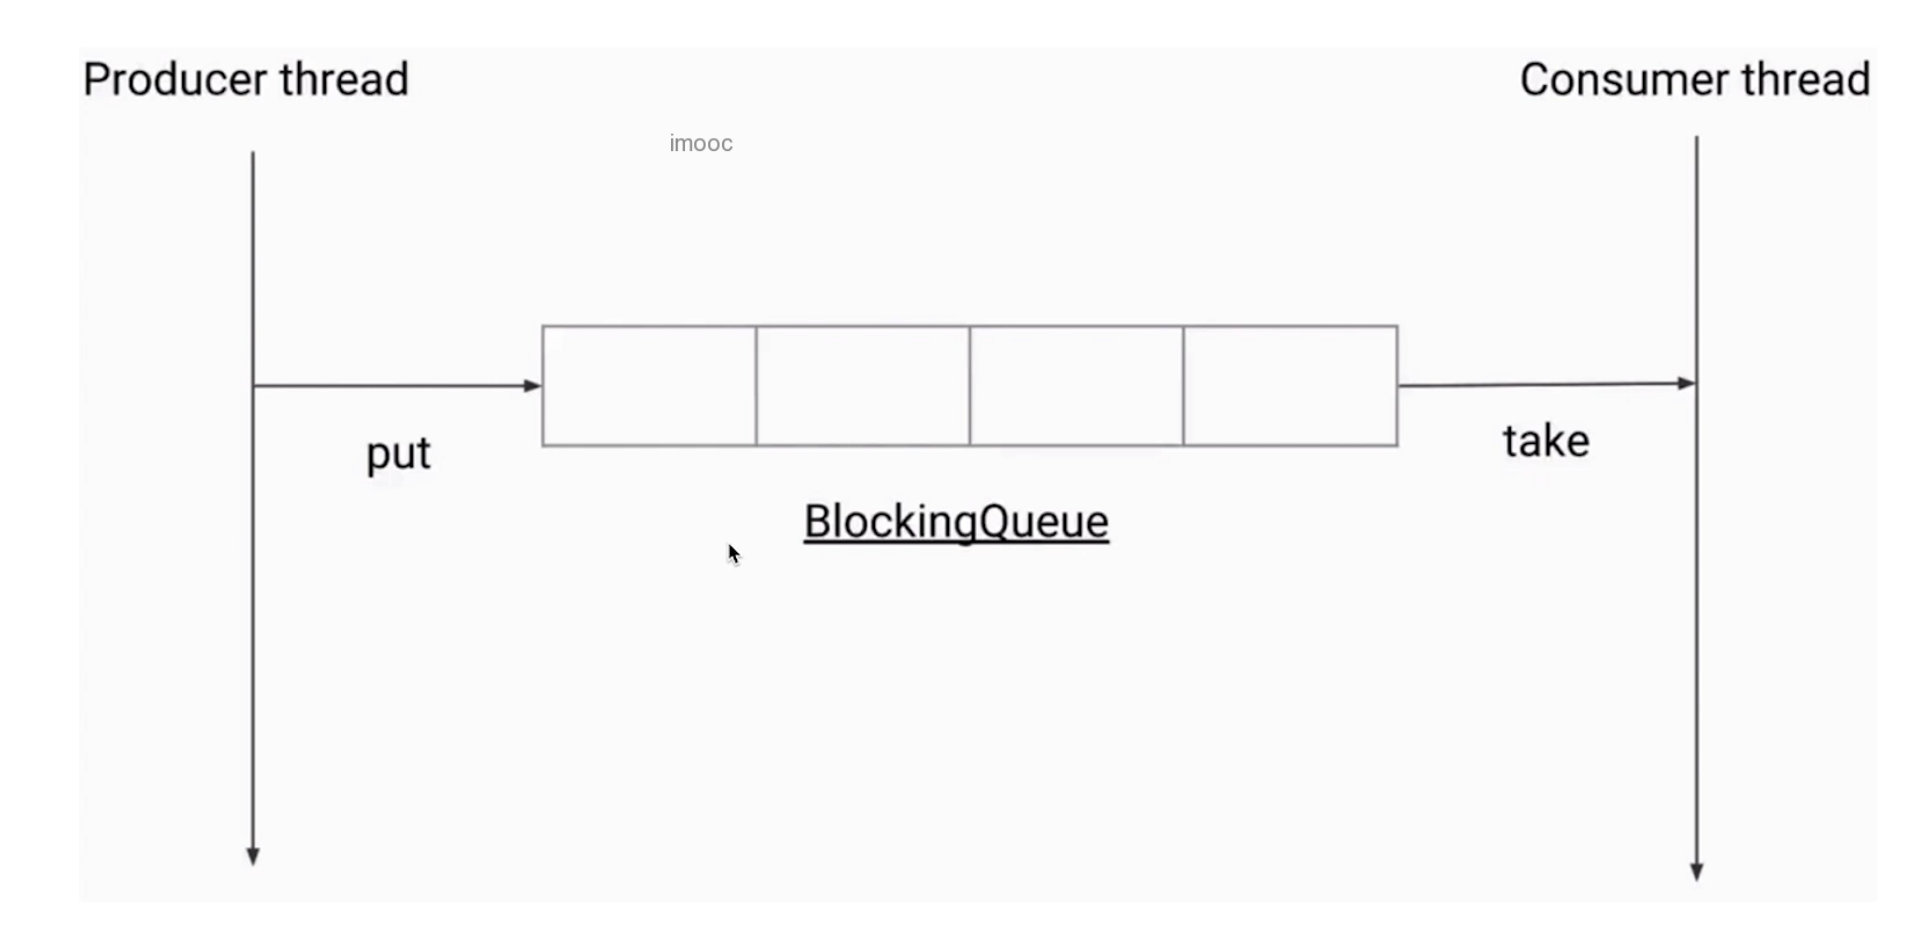
- 阻塞队列是具有阻塞功能的队列。
- 通过,阻塞队列的一端是给生产者放数据用,另一端是给消费者拿数据用。
- 阻塞队列是线程安全的,所以生产者和消费者都可以是多线程的。
- 阻塞队列是线程池的重要组成部分。
# 6.1.2 take()/put()
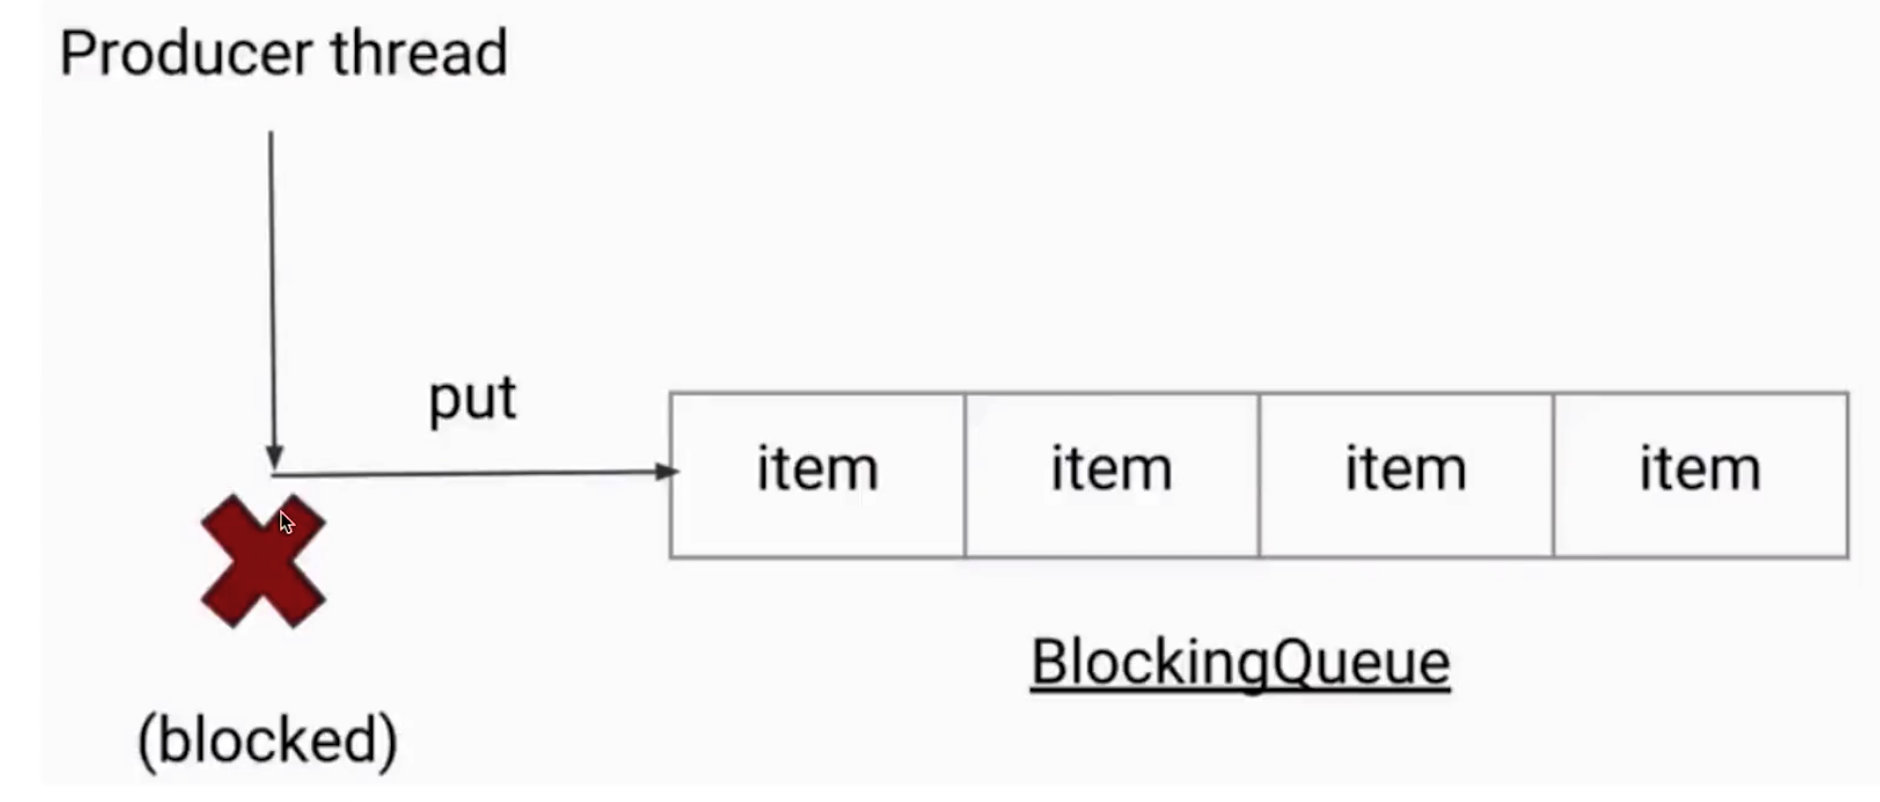
- take():向队列中拿一个数据,队列为空位阻塞。

- put():向队列中放一个数据,队列满了会阻塞。
# 6.1.3 add()/remove()/element()
- add():向队列中添加一个数据,队列满了会抛异常。
- remove():从队列中删除一个数据,队列空了会抛异常。
- element():会返回队头的元素,队空时会抛出异常。
# 6.1.4 offer()/poll()/peek()
- boolean offer():添加一个元素,成功与否通过返回 boolean 来判断,不会抛异常。
- poll():试图取出一个元素,空的返回 null,会删除元素,不会抛异常。
- peek():试图取出一个元素,空的返回 null,不会删除元素,不会抛异常。
# 6.2 ArrayBlockingQueue
- 有界
- 可以指定容量
- 可以指定是否公平:如果想保证公平的话,那么等待了最长时间的线程会被优先处理,不过这会同时带来一定的性能消耗。
# 6.2.1 put()
public void put(E e) throws InterruptedException {
  	//1. 检查要插进队列的值是否为空
    checkNotNull(e);
  	//2. 获得锁
    final ReentrantLock lock = this.lock;
  	//3. 可中断加锁
    lock.lockInterruptibly();
    try {
      	//4. 满了的话就阻塞
        while (count == items.length)
            notFull.await();
      	//5. 没满就插入队列
        enqueue(e);
    } finally {
      	//6. 解锁
        lock.unlock();
    }
}
# 6.2.2 take()
public E take() throws InterruptedException {
    //1. 获得锁
    final ReentrantLock lock = this.lock;
  	//2. 可中断加锁
    lock.lockInterruptibly();
    try {
      	//3. 队列空则阻塞
        while (count == 0)
            notEmpty.await();
      	//4. 队列不空则去出队头元素
        return dequeue();
    } finally {
      	//5. 解锁
        lock.unlock();
    }
}
# 6.3 LinkedBlockingQueue
- 可以指定容量,默认无界(Integer.MAX_VALUE)
# 6.3.1 put()
public void put(E e) throws InterruptedException {
  	//1. 检查是否为空
    if (e == null) throw new NullPointerException();
    // 这个 c 是用来记录修改了多少次,如果还是为 -1 的话就表示失败
    int c = -1;
  	//2. 创建出新结点
    Node<E> node = new Node<E>(e);
  	//3. 拿到 put 锁
    final ReentrantLock putLock = this.putLock;
  	//4. 计数
    final AtomicInteger count = this.count;
  	//5. 上可中断锁
    putLock.lockInterruptibly();
    try {
        //6. 如果到容量了,阻塞
        while (count.get() == capacity) {
            notFull.await();
        }
      	//7. 没到容量,入队
        enqueue(node);
      	//8. 迭代 count++,返回旧的 count
        c = count.getAndIncrement();
      	//9. 通知其他线程是否已经满了
        if (c + 1 < capacity)
            notFull.signal();
    } finally {
      	//10. 解锁
        putLock.unlock();
    }
  	//11. c 拿到的是旧 count,如果 c == 0,说明新的 count 是1,所以通知其他线程说队列非空
    if (c == 0)
        signalNotEmpty();
}
# 6.3.2 take()
public E take() throws InterruptedException {
    E x;
  	//这个 c 是用来记录修改了多少次,如果还是为 -1 的话就表示失败
    int c = -1;
  	//1. 获取当前元素个数
    final AtomicInteger count = this.count;
  	//2. 获取 take 锁
    final ReentrantLock takeLock = this.takeLock;
  	//3. 加可中断锁
    takeLock.lockInterruptibly();
    try {
      	//4. 如果队列为空则阻塞
        while (count.get() == 0) {
            notEmpty.await();
        }
      	//5. 队列不为空则拿出队头
        x = dequeue();
      	//6. 迭代count--,返回旧的 count
        c = count.getAndDecrement();
      	//7. 旧的 count > 1,说明新的 count > 0,非空
        if (c > 1)
            notEmpty.signal();
    } finally {
      	//8. 解锁
        takeLock.unlock();
    }
  	//9. 如果旧的 count == capacity,又因为已经取出一个元素了,说明现在不满,通知其他线程现在没有满
    if (c == capacity)
        signalNotFull();
  	//10. 返回取出来的元素
    return x;
}
# 6.4 PriorityBlockingQueue
# PriorityQueue 主要方法时间复杂度
boolean add(E e):O(logn)
boolean contains(Object o):O(n)
E peek():O(1)
E poll():O(logn)  //最小堆,拿出最小的
boolean remove(Object o):O(n)
int size():O(1)
- 支持优先级
- 支持自然排序(不是先进先出)
- 并发采用 ReentrantLock
- 不可插入 null
- 无界队列(会扩容)
# 6.5 SynchronousQueue
- 容量为 0,因为 SynchronousQueue 不需要去持有元素,它所做的就是直接传递。
- SynchronousQueue 没有 peek() 等函数,因为 peek() 的含义是取出头结点,但是 SynchronousQueue 的容量是 0,所有连头结点都没有,也就没有 peek() 方法。同理,没有 iterate() 等方法。
- 是一个极好的用来直接传递的并发数据结构。
SynchronousQueue是线程池Executors.newCachedThreadPool()使用的阻塞队列。- 使用场景:生产者和消费者必须步调一致,有人要消费的时候才允许生产者来生产,意味着一个put() 操作必须等待另一个take() 操作完成。

# 6.6 DelayQueue
- 延迟队列,根据延迟时间排序。
- 元素需要实现 Delayed 接口,规定排序规则。
# 6.7 非阻塞队列 ConcurrentLinkedQueue
- 使用 CAS 非阻塞算法来实现线程安全。
# 6.7.1 offer()
- offer() 中的 casNext() 方法调用了 UNSAFE.compareAndSwapObject()
# 7. ConcurrentSkipListMap
# 7.1 SkipList
SkipList 部分内容参考博客:https://blog.csdn.net/chenssy/article/details/75000701
# 7.1.1 说明
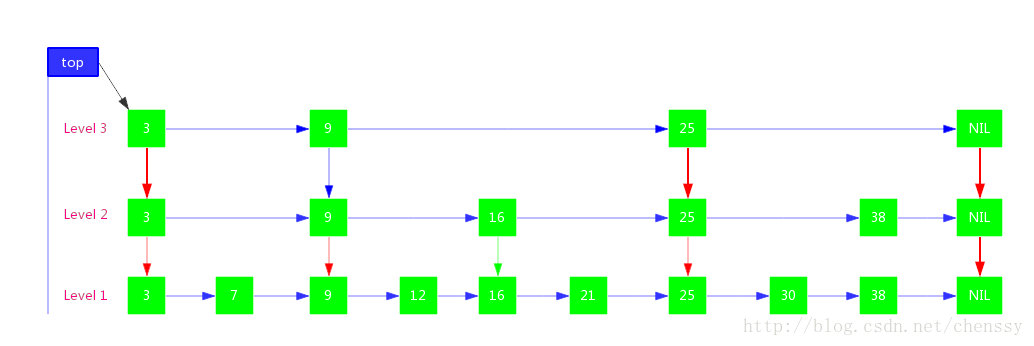
跳表,它是一种可以替代平衡树的数据结构,其数据元素默认按照key值升序,天然有序。Skip list让已排序的数据分布在多层链表中,以0-1随机数决定一个数据的向上攀升与否,通过“空间来换取时间”的一个算法,在每个节点中增加了向前的指针,在插入、删除、查找时可以忽略一些不可能涉及到的结点,从而提高了效率。
简单的链表:

如果我们需要查询9、21、30,则需要比较次数为3 + 6 + 8 = 17 次,那么有没有优化方案呢?有!我们将该链表中的某些元素提炼出来作为一个比较“索引”,如下:

我们先与这些索引进行比较来决定下一个元素是往右还是下走,由于存在“索引”的缘故,导致在检索的时候会大大减少比较的次数。当然元素不是很多,很难体现出优势,当元素足够多的时候,这种索引结构就会大显身手。
# 7.1.2 特性
- 由很多层结构组成,level是通过一定的概率随机产生的
- 每一层都是一个有序的链表,默认是升序,也可以根据创建映射时所提供的Comparator进行排序,具体取决于使用的构造方法
- 最底层(Level 1)的链表包含所有元素
- 如果一个元素出现在Level i 的链表中,则它在Level i 之下的链表也都会出现
- 每个节点包含两个指针,一个指向同一链表中的下一个元素,一个指向下面一层的元素
我们将上图再做一些扩展就可以变成一个典型的SkipList结构了
# 7.1.3 查找
SkipListd的查找算法较为简单,对于上面我们我们要查找元素21,其过程如下:
- 比较3,大于,往后找(9),
- 比9大,继续往后找(25),但是比25小,则从9的下一层开始找(16)
- 16的后面节点依然为25,则继续从16的下一层找
- 找到21
如图

红色虚线代表路径。
# 7.1.4 插入
SkipList的插入操作主要包括:
- 查找合适的位置。这里需要明确一点就是在确认新节点要占据的层次 K 时,采用丢硬币的方式,完全随机。如果占据的层次 K 大于链表的层次,则重新申请新的层,否则插入指定层次。
- 申请新的节点
- 调整指针
假定我们要插入的元素为 23,经过查找可以确认它是位于 25 前面,9、16、21 后面。当然需要考虑申请的层次K。
如果层次K > 3
需要申请新层次(Level 4)
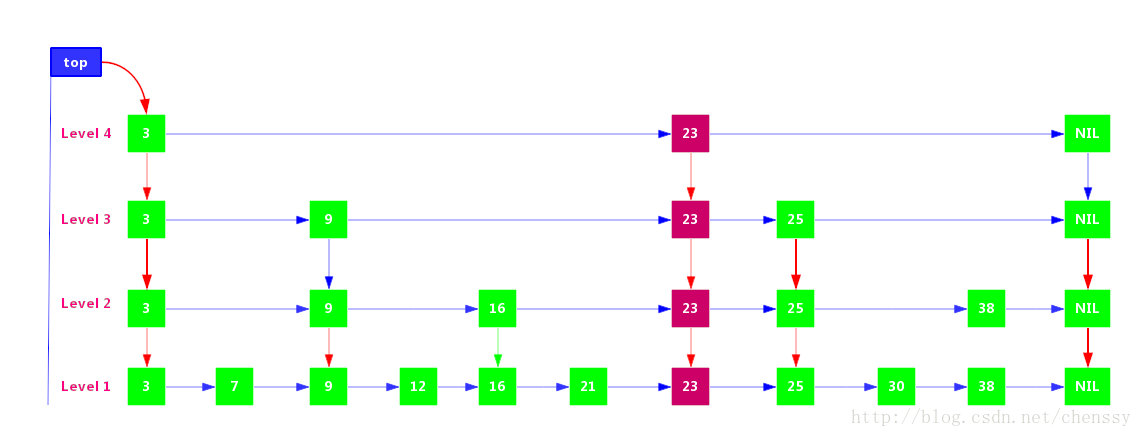
如果层次 K = 2
直接在Level 2 层插入即可

需要注意的地方就是,在 K 层插入元素后,需要确保所有小于 K 层的层次都应该出现新节点。
# 7.1.5 删除
删除节点和插入节点思路基本一致:
- 找到节点
- 删除节点
- 调整指针。
比如删除节点9,如下:

# 7.2 ConcurrentSkipListMap
ConcurrentSkipListMap 其内部采用 SkipLis 数据结构实现。
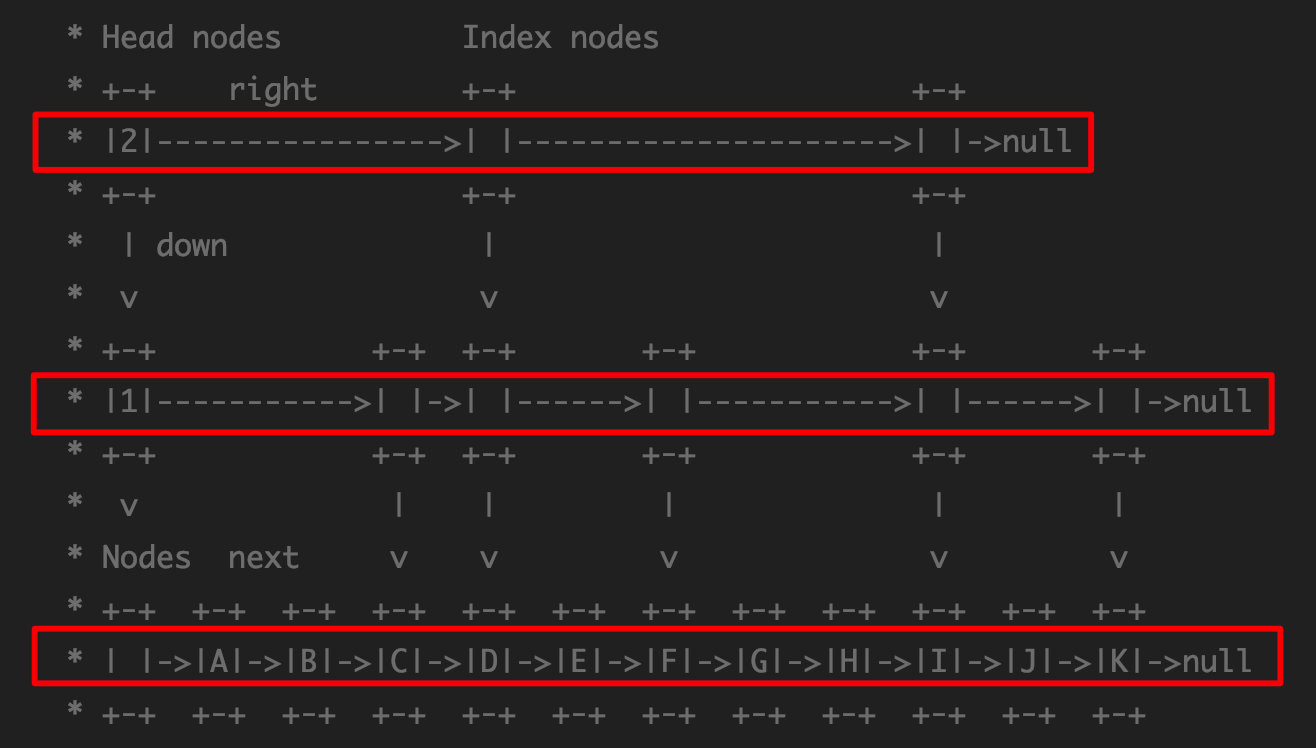
使用 CAS 保证并发安全。

